

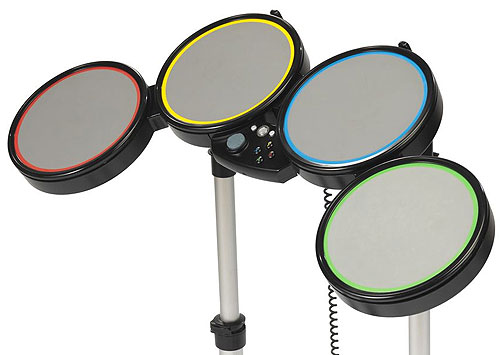
D.I.Y. Switch Adapted Drums for Rock Band
If you're an absolute beginner, we strongly recommend that you follow "The Basic Soldering Guide" - by Alan Winstanley. You may like to consider trying the Rock Band Guitar switch adaptation first as this is a considerably easier project.
SAFETY: Adapting equipment voids the manufacturer's guarantee, and the attempt may cause irreparable damage. Always use adapted equipment under supervision, and disconnect power when not in use. These adaptations are at your own risk. Good luck!
Most of the basic components used here are commonly available from Electronics stores such as Maplin Electronics and Farnell. The ROCK BAND "Instrument Edition" can readily be found in stores as well as Amazon and eBay. Atari Joystick extension leads can be found via Google, such as from Jack Berg Sales, or can be built from scratch with a bit of patience.
Stuff to think about before you start
Accessibility switches are essentially simple on/off devices which connect to adapted equipment via 3.5mm sockets. The Rock Band drums have very little accessible room to mount the four sockets needed internally (one for each pad).
My preferred solution is to build an external switch interface box that can be connected directly to the Rock Band PCB via D9 connectors. This kind of approach is pretty much essential for the Playstation version which requires a battery. The Xbox 360 however does not, so you may choose to prise open the drums and mount the sockets within the casing. That's the brave route!
The following step by step guide explains a method for adapting drums for the PS2 and PS3 (both share the same drums) and the Xbox 360.
1. What you will need


- 1x Harmonix Rock Band Drum Kit
- 4 x 3.5mm sockets (e.g. Farnell "126-7396")
- 1x D9 male connector (solder type)
- 4x Small nuts and bolts to secure D9 connectors.
- 1x AAA Battery Holder (Playstation drums only).
- Soldering iron (15 to 30 Watt power); thin solder; soldering flux; de soldering braid; thin wire (e.g. 10 strand 0.1mm), Shrink Wrap (optional).
- Cordless drill with 7.5 mm drill bit; Knife or wire strippers; small screwdriver set; Needle nose pliers; Small hot glue gun; Small file set. Interface Box Suggested Components:
- 1x small box (e.g. T3 = 75x51x25mm)
- 1x D9 female connector (solder type)
- 1x D9 Atari/Megadrive extension lead.
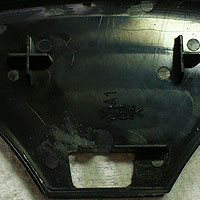
2. Basic Preparation

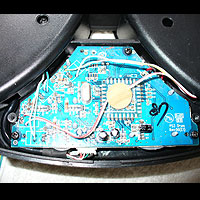
Flip the drum kit over face down. Remove the rear PCB cover. The Playstation version has two screws (as pictured left) and the Xbox 360 has three.
You should see a PCB (printed circuit board) with four sets of wires. These colour-coded wires connect to a piezoelectric sensor under each drum pad. When you strike the drum pad a small voltage is triggered that Rock Band recognises.
Xbox 360: Unscrew the PCB from its fixed position.
Playstation: Leave the PCB in place.
3. Testing as you go
Rock Band drum kits are recognised by a PC as a USB game controller. Using the Game Controller Properties utility (found via the Control Panel) you can easily test your drum pad adaptation. The drum pads are recognised as buttons 1-4 (see image left).
An Xbox 360 controller driver may need to be installed first so that the Xbox 360 Rock Band drums can be recognised.
N.B.Always ensure that the drums are unplugged when soldering.
4. Xbox 360 Rock Band PCB Wiring Guide

Five additional wires need to be soldered into the Xbox 360 PCB corresponding to the X,Y,A,B buttons and the shared ground ('common') point. You can easily test that you have the correct points by using the Joystick Controller Properties utility and shorting a point from the 'common' to each of the four points marked above.
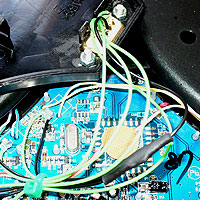
Wiring tips: Unplug your drums if still connected to your PC or console. Cut five lengths of wire then expose a very short portion of bare wire at one end of each. Carefully poke this end through each identified point on the PCB. On the reverse side of the PCB carefully stroke the protruding wires into position. Flux this point then carefully solder into place (see image below).
Reconnect your drums so that you can test them. Do this by touching an exposed end of one of each numbered wire to the exposed end of the common wire. If all works out well, move onto section 5. Otherwise recheck the quality of your soldering.
4. Playstation Rock Band PCB Wiring Guide
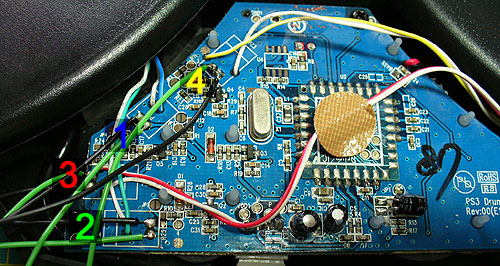
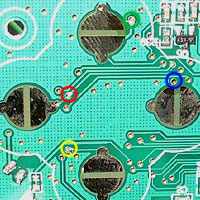
Unlike the Xbox 360 version, soldering directly onto the contacts of the Playstation control panel buttons is exceptionally difficult. The alternative is to wire into each drum pad's piezoelectric sensor as marked out above and to add a small power source.
Test each connection by connecting a 1.5 volt battery between each numbered point's two trailing wires (the coloured wire goes to the negative terminal of the battery). If all is well, wire all four of the common wires (mine are black above) together, leaving you with five separate wires in total. Proceed to step 5 below.
5. Hot Glue
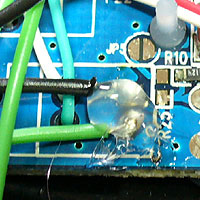
Hot glue the new wires onto the PCB at each fresh solder point to add strength (Playstation solder points illustrated left).
6. Fitting a D9 Connector

My personal choice here is to fit a D9 (aka RS232) connector. It is important to cut a hole in the PCB cover at the exact same position as pictured left. This location is clear of components on the PCB when fitted.
Use a soldering iron to burn through the basic shape (in a well ventilated room), then carefully use a knife and files to make the correct shape. Secure the D9 connector with nuts and bolts as possible and ideally with hot glue too.
Cut your trailing wires to adequately reach the socket. Look very carefully at the rear of the socket to read the numbering of each pin. Wire up using the following guide:
- DRUM 1
- DRUM 2
- DRUM 3
- DRUM 4
- Common (aka 'ground')
- Hot glue your wires in place to better secure them and insulate them from any risk of touching the PCB.
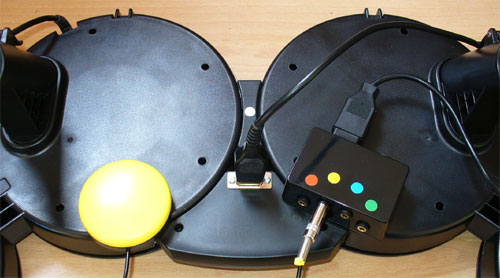
6. Interface Box


There are lots of ways to build a switch interface box, however the basics are as follows:
Cut out another hole for the adjoining D9 socket, drill four 7.5mm holes for your switch sockets and drill a hole for an on/off switch.
Take your four 3.5mm switch sockets and solder two lengths of wire to each as pictured left. Use heat-shrink tubing if you wish to add strength and to insulate. Remove the metal nut.
Push each socket through the four drilled holes via the front of the casing. Fasten in place from the rear with the metal nut.
Connect all four common leads together (the black wires pictured left) from your sockets. Wire these directly to one terminal of an on/off switch. From the other terminal of the on/off switch take a wire:
Xbox 360: Directly to pin 8 of the D9 socket, or...
Playstation: To the negative terminal of your 1.5 volt battery holder. Next take a wire from the positive terminal directly to pin 8 of the D9 socket.
7. Testing

The fun bit (well if it all works). Connect the drums and interface box together via a D9 extension lead. Plug in your accessibility switches then test out on a PC. Better still, test out on the Practice area of Rock Band.
If there are any problems, carefully examine the quality of your soldering and that your wiring is correct.
8. What else can I do with this?

Apart from playing Rock Band, you can use the drums to play any sound sample on a PC.
AndrewRudson.com has a pretty nice drum package although you may find better functioning software by scouring the web. You can find many sound samples here.
You can use JoyToKey to assign any key press to the drum pads (recognised as joypad buttons 1-4) to open up other drum packages not designed to support the Rock Band drums.
D.I.Y. Text and images PUBLIC DOMAIN 2009 - www.OneSwitch.org.uk